Yackety‑Yack, Packin' a 'Yak
By Tamia Nelson
tamia@paddling.net
May 8, 2012
If tandem touring canoes are the F‑150s of paddlecraft, kayaks are the MGBs. And as anyone who's ever driven an MGB Mark II roadster will know, they're not pickup trucks. This can make trouble for folks who are new to kayak touring. Deciding what to take isn't the problem. Equipment lists and general advice on what to pack can be found in many places nowadays — at Paddling.net, in books, on outfitters' websites, and in numberless blogs. I've even seen packing lists carved into the walls of Adirondack lean‑tos. Nor is serviceable gear hard to come by. The days when paddlers had to order tents and stoves from European speciality outlets or climbers' co‑ops like REI are a dim and distant memory. If you've got the cash, you can get all the stuff you'll need in a day or two. A lot of it can probably be found on the shelves of your local HyperMart, just a couple of aisles down from the wading pools and string trimmers. The upshot? Assembling the gear for a trip isn't difficult. The aggro starts when you have to find a place in your 'yak to put it.
This is the moment when you come up against a fundamental difference between canoes and kayaks: Most canoes go topless, but few kayaks do. A canoe always has room for one more bag. (No, this is not an argument for overloading a boat!) In a kayak, however, all of your gear — well, most of it, at any rate — has to be stored below decks. If it can't be made to fit, it doesn't go.
Every paddler approaches this problem in her (or his) own way, though the learning process can be a sweaty and frustrating business, in which bags that are too big to squeeze into odd‑shaped spaces are hastily unpacked and last‑minute decisions made about which "essentials" to leave behind. (Worse things follow when the newly purged bags still don't fit, or when you discover, many miles downriver, that you left the cooking pots at the put‑in.) Experienced paddlers will already have figured out what works for them, of course. Or they'll have bought canoes. But beginners — and many one‑trip‑a‑year kayakers — are often left to work things out on their own.
A little help would be appreciated, I'm sure. And over the years, we've done our bit (see, for example, "Starting Out in Kayaking" and "Moving On"), but we've never directly addressed the problems that crop up when loading a kayak. I was reminded of this a few months ago, when a reader named Jason wrote to me with questions about packing a rucksack, questions that an earlier article on the subject hadn't answered. So I wrote another article — the first in the "Picture This" series — to illustrate how I organize my getaway pack. Sometimes a picture really is worth a thousand words.
But Jason also had some questions about stowing gear in a kayak:
I just returned from a four-day, 75-mile paddling trip on the Current River in Missouri and it was great, but one problem I had ... was that much of my gear was too big to fit. I also had trouble remembering which bag held what items. I would be interested to see a "picture" article on how you would pack your kayak for a multi-day campout.
That's when it struck me that the two subjects weren't entirely unrelated. Both getaway packs and kayaks impose frustrating space constraints. And Jason was right: Another article was called for, with the subject this time being …
But as I no longer own a hard‑shell kayak, the process of putting it together has proven to be something of a trip down memory lane. (There's a folding 'yak on the shelf over my desk, though. I got it for amphibious jaunts, and I'll have more to say about it in a later article.) Luckily, I have all the notes I made during our kayak tours, plus the photos to go with them. And while kayak fashions may change with every new season — long and lean this year, short and chubby the next — the rules of packing don't.
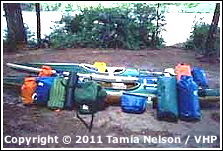
A little background first: The "models" in the following photos are circa‑1980 Seda Vagabonds. They were high‑volume, Kevlar‑'glass tripping kayaks — think of them as stretched slalom boats — better suited to fast rivers than open water, though strong paddlers who were prepared to work the tides could (and did) take them almost anywhere. They had longitudinal foam walls, but no transverse walls and no hatches. The seating arrangements in our two boats differed: Farwell's had a foam platform seat with a webbing backrest, while mine — it's the one with the white seam tape in the photo below — had a more conventional molded 'glass drop seat. (As I'll explain, this difference had important consequences.) Now here's a look at went into them. It's Day Three of a two‑week trip

And as you can see, these Vagabonds could accommodate a lot of gear. But the photo doesn't tell you much about the bags themselves. Let's remedy that:

The numbers correspond to the items in the list below. Numbers 1 through 12 identify the gear I carried, while 13 through 23 went into Farwell's boat:
- Dry bag (bow, port side)
- Dry bag (bow, starboard side)
- Neoprene sprayskirt (worn)
- PFD with whistle attached to the zipper pull (worn)
- Water bottle
- Sponge (in bilge)
- Ammo can with camera and lenses (ditto)
- Tent poles and stakes in stuff sack (ditto)
- Medical kit and sundries in dry bag
- Ensolite sleeping pad
- Dry bag (stern, port side)
- Dry bag (stern, starboard side)
- Dry bag (bow, port side)
- Neoprene sprayskirt (worn) with dry bag (bow, starboard side) behind
- PFD (worn)
- Ensolite sleeping pad
- Empty rucksack (used to carry odds and ends during portages)
- Sponge
- Medical kit and sundries in dry bag
- Water bottle
- Freighter packframe
- Dry bag (stern, port side)
- Dry bag (stern, starboard side)
Other items, not shown in the photo:
- 25‑foot painters (tied to each stern grab loop)
- Two paddles (double‑bladed, of course)
- Two breakdown spare paddles (one with each boat)
- Maps in waterproof ziplock bags (both boats)
- Compass (one each, worn on person, plus spare compass in dry bag)
Now let's take a look at the contents of the dry bags. There were five in each boat, sized to fit the space available. Two went under the bow deck, just forward of the foot pegs, while two larger bags nestled under the stern deck. The last, an envelope‑like bag with a slide closure, was tucked behind the seat. It held a motley collection of items that we might need to get at quickly, including …
- A medical kit (always)
- A small roll of bumwad (always)
- Snacks (always)
- Spare eyeglasses and sunglasses (always)
- Lunch (sometimes)
- A rain jacket (sometimes)
- Insect repellent (sometimes)
- A headnet (sometimes)
- Sunscreen (sometimes)
The large stern bags held the bulkiest gear, such as …
- Our tent and fly (if dry)
- A groundsheet (ditto)
- A tarp (ditto)
- The cook kit and washing‑up tackle
- Stove and fuel bottle (in a double ziplock bag, just in case)
- A collapsable 5‑gallon water jug
- Our sleeping bags
- Food bags
- A camp lantern
While the bow dry bags contained smaller items, like …
- Spare clothes
- Pile sweaters and suchlike
- Foul‑weather gear (when not in use)
- Camp footwear
- Ditty bags
- Headlamps
- Toiletries
- Books and notebooks
- Cockpit cover (keeps rain out of the boat when ashore; also keeps jays and four‑legged snatch‑and‑grab artists at bay — sometimes)
Other frequently used items were wedged into the gap between seat and hull in each boat. That's where the stuff sack containing the tent poles and stakes went (and the tent, as well, if it was wet or muddy). A sponge and water bottle were usually to be found there, too.
Maybe you're wondering about flotation. And you should. Kayaks have been known to turn turtle, and they sometimes — rarely, but it does happen — develop slow leaks around seams or fittings. That's why it's important to fill any space in a kayak that isn't occupied by the paddler or waterproof gear bags with something that floats, even if that space is in a notionally waterproof compartment. As luck would have it, the Vagabonds didn't have any waterproof compartments, notional or otherwise, but there was plenty of empty space at the ends, and this played host to four sturdy vinyl float bags. These were large enough to permit "growing" them to fill any new space as soon it became available — as it did, for instance, when we ate our way through our food stores.

You've probably noticed the painters stretched over the boats in this picture. They're there because a cold front was moving in that night, and we didn't fancy leaving our kayaks at the mercy of the wind. You can see the cockpit covers in the photo, too. Mine was a makeshift affair, just a sheet of coated nylon secured with a line around the cockpit coaming, but it worked fine. The covers kept the boats from filling with rainwater, and they also discouraged any foraging mice. (We never stored food in our boats in camp, but sometimes crumbs from snacks found their way into the bilge.)
Back to the packframe for a minute. Kayakers don't often consider packframes when making up their gear lists, but if your route involves more than an occasional portage, a packframe is well worth bringing along. Why? Keep reading.
Kayaks are lithe and lively craft afloat, but they're reduced to cumbersome burdens when ashore. Short portages can be managed by doubling up, two to a boat, and then muscling the loaded craft down the trail. A word of warning is in order here, however: Before you heft a loaded boat, make sure it can stand the strain. Not all kayaks can. And even if you're certain that yours is up to the job, it's best to cradle the bow and stern in your hands or rest them on your shoulders, rather than relying on the grab loops. Before you've gone a hundred yards, though, you'll learn why this method is for short portages only. Longer treks are much more pleasant if you take all the gear out of your boat and carry it solo. It makes for a lot of work teasing reluctant bags out of tight corners, however. Farwell, whose boat's seat was just a slab of foam, simply loosened his webbing backrest and slid his dry bags out from under the stern deck. I, on the other hand, had to struggle to tug my luggage through the small opening in my molded seatback. What a nuisance that was! It didn't take me long to conclude that dropped, molded seats are best avoided in touring kayaks.
Unloading the boat was just the first step, of course. Then it was time to shepherd the beast across the portage. The over‑the‑shoulder, arm‑in‑the‑cockpit technique favored by whitewater boaters works, after a fashion, but it's surprisingly awkward for extended carries, particularly when you have to negotiate overgrown paths. It's uncomfortable, too. The cockpit coaming digging into your shoulder is only an annoyance at the start, but before long you'll probably find it agonizing. A piece of foam pipe insulation fitted over the flange blunts the cutting edge somewhat, but we thought we had a better idea. It involved a packframe…

And no, despite appearances, Farwell wasn't flying blind. When he headed down the trail, he simply lifted the kayak's bow until he could see what lay ahead. Boat and gear made the crossing in a single trip, with the kayak riding high atop the frame. (The photos in this article were made while we were still trialing the system. Once we were convinced that it worked, we got a second frame. Portages were even quicker after that.) Of course, we still had to unload the boats at every trailhead and then repack them at the next put‑in, but such is life. The job is much easier with a pack canoe. On the other hand, a pack canoe isn't at its best in Class IV rapids, let alone Force 7 gusts. No boat does everything well.
OK. I've described what went into our boats and how the deck gear was secured. I've also had something to say about the mechanics of carrying the load on dry land. But I've yet to show …
Where All the Gear Went
And for that I'll need a little help. A backscatter x‑ray scanner would be ideal — I wonder if Homeland Security has put any of these up for sale on eBay? — but failing that I'll just have to make use of more primitive technology: a pencil. Here's how my boat looked, both below decks and (a no‑extra‑cost bonus!) topside:

By my reckoning, this is worth at least 2,000 words of explanation, despite the slightly wobbly draftsmanship and dodgy proportions. That said, I think you'll agree that a few more words could be used to good advantage, beginning with a key to the drawings. So here goes: The numbers in the sketch refer back to my earlier list, while the items identified by letter are described below:
- Float bag, bow, starboard side
- Float bag, bow, port side
- Float bag, stern, starboard side
- Float bag, stern, port side
- Breakdown paddle (often turned round the other way)
- 25‑foot braided nylon painter
- Rubber‑rope deck rigging
After several trips when, on at least one occasion, we had to remove and empty nearly every bag to find a single item that we needed, we instituted a system of color‑coding and numbering to make things easier. We also slimmed down individual items of gear as our budget allowed, purchasing lighter and more compact sleeping bags, pads, and tents, in the hope that slimmer gear meant slimmer bags, and that this meant loading and unloading the boats would go faster. It did.
Slimming the load is one thing, however. Trimming your boat, another. And the subject of trim warrants a word or two, as well. By and large, I distributed the weight so that my boat floated level with me aboard, though in very strong headwinds (Force 6–7, say) I sometimes trimmed my boat a little down by the head. But that made dealing with breaking swells harder — an especially annoying problem in touring kayaks based on slalom boats, which have a tendency to submarine under the best of circumstances. My advice, then? Unless you're keen to experiment, I'd plan to stay on an even keel.
So much for my boat. What about Farwell's? Well, there's not much to add. He adopted the same packing scheme I did, though he wasn't burdened with an ammo can carrying an SLR, three lenses, and 10 rolls of film. He did carry our packframe on his stern deck during the trial period, though. But I got a frame of my own later, canceling out this small advantage. Then again, Farwell got an ammo can for his binoculars and spotting scope, so honors were even.
And that's that. I'm sure you've got the picture. But don't make the mistake of thinking you can copy our system exactly. Your kayak won't be laid out like ours were, after all. In particular, transverse bulkheads and hatches are bound to complicate matters. Yet the principles remain the same. Match your bags to the available space, fill any empty corners with flotation, keep track of what goes where, and trim the loaded boat level. (Remember, too, that you are a large part of the load.) In short, there's no packing problem that can't be solved by trial and error. Just be sure to give yourself plenty of time for a couple of dry runs before you leave for the put‑in. The first day of a trip is no time to discover that you can't get your sleeping bag into your boat!
Packing a canoe is pretty easy. Just heave the gear in, check the trim, and tie your bags down. It's not much harder than tossing lumber into the bed of a pickup truck. But what about loading a kayak with all the gear needed for an extended tour? That requires a lot more finesse. It's like packing an old MGB roadster for a cross‑country trip. It can be done, but it takes careful planning. And you've just seen some ways to make the job easier. Can you picture this now? Of course you can!
+